I’ve been hot-rodding older MacBook, MacBook Pro, and MacBook Air machines for a few years with NVMe SSD drives and Sintech and QNINE adapters. I’ve found just about every NVMe drive, if properly formatted, will work with these machines; however, I have noticed several times now where these machines break into kernel panics, as shown below and discussed by others, with the first line of errors that would typically be seen in Apple’s Bug Reporter:
panic(cpu 0 caller 0xffffff80207597c6): nvme: "3rd party NVMe controller. Loss of MMIO space. Write.
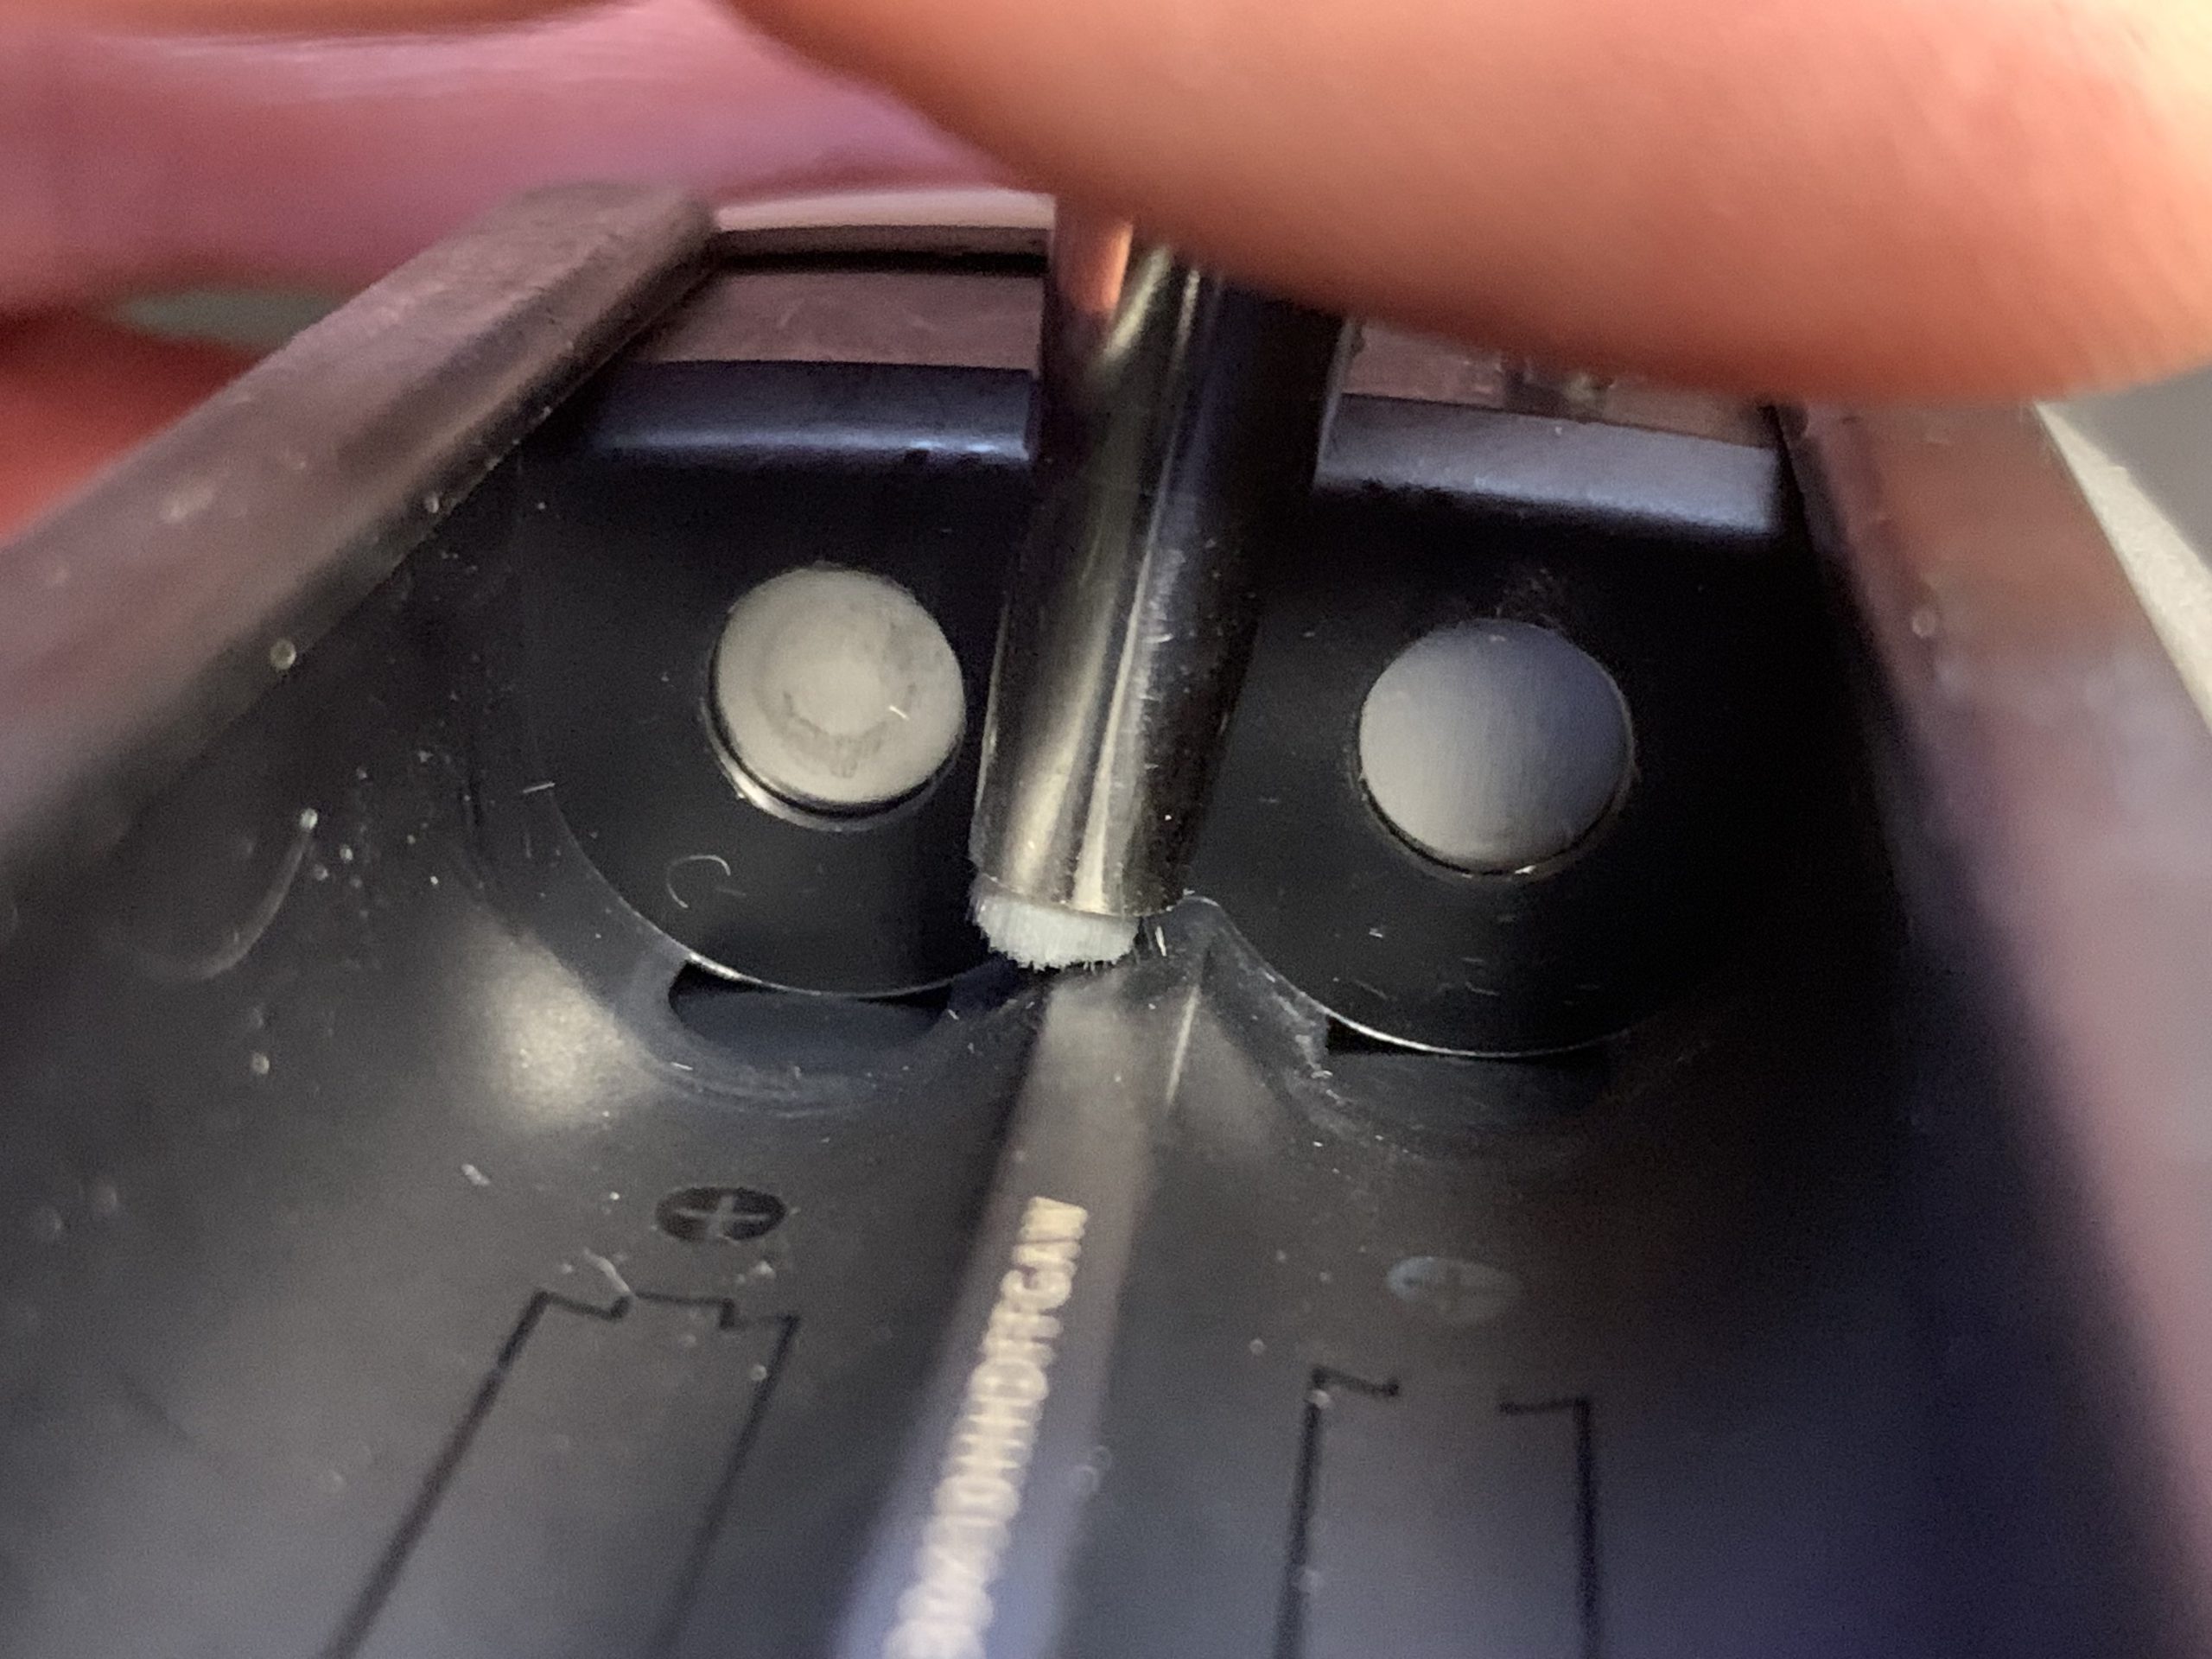
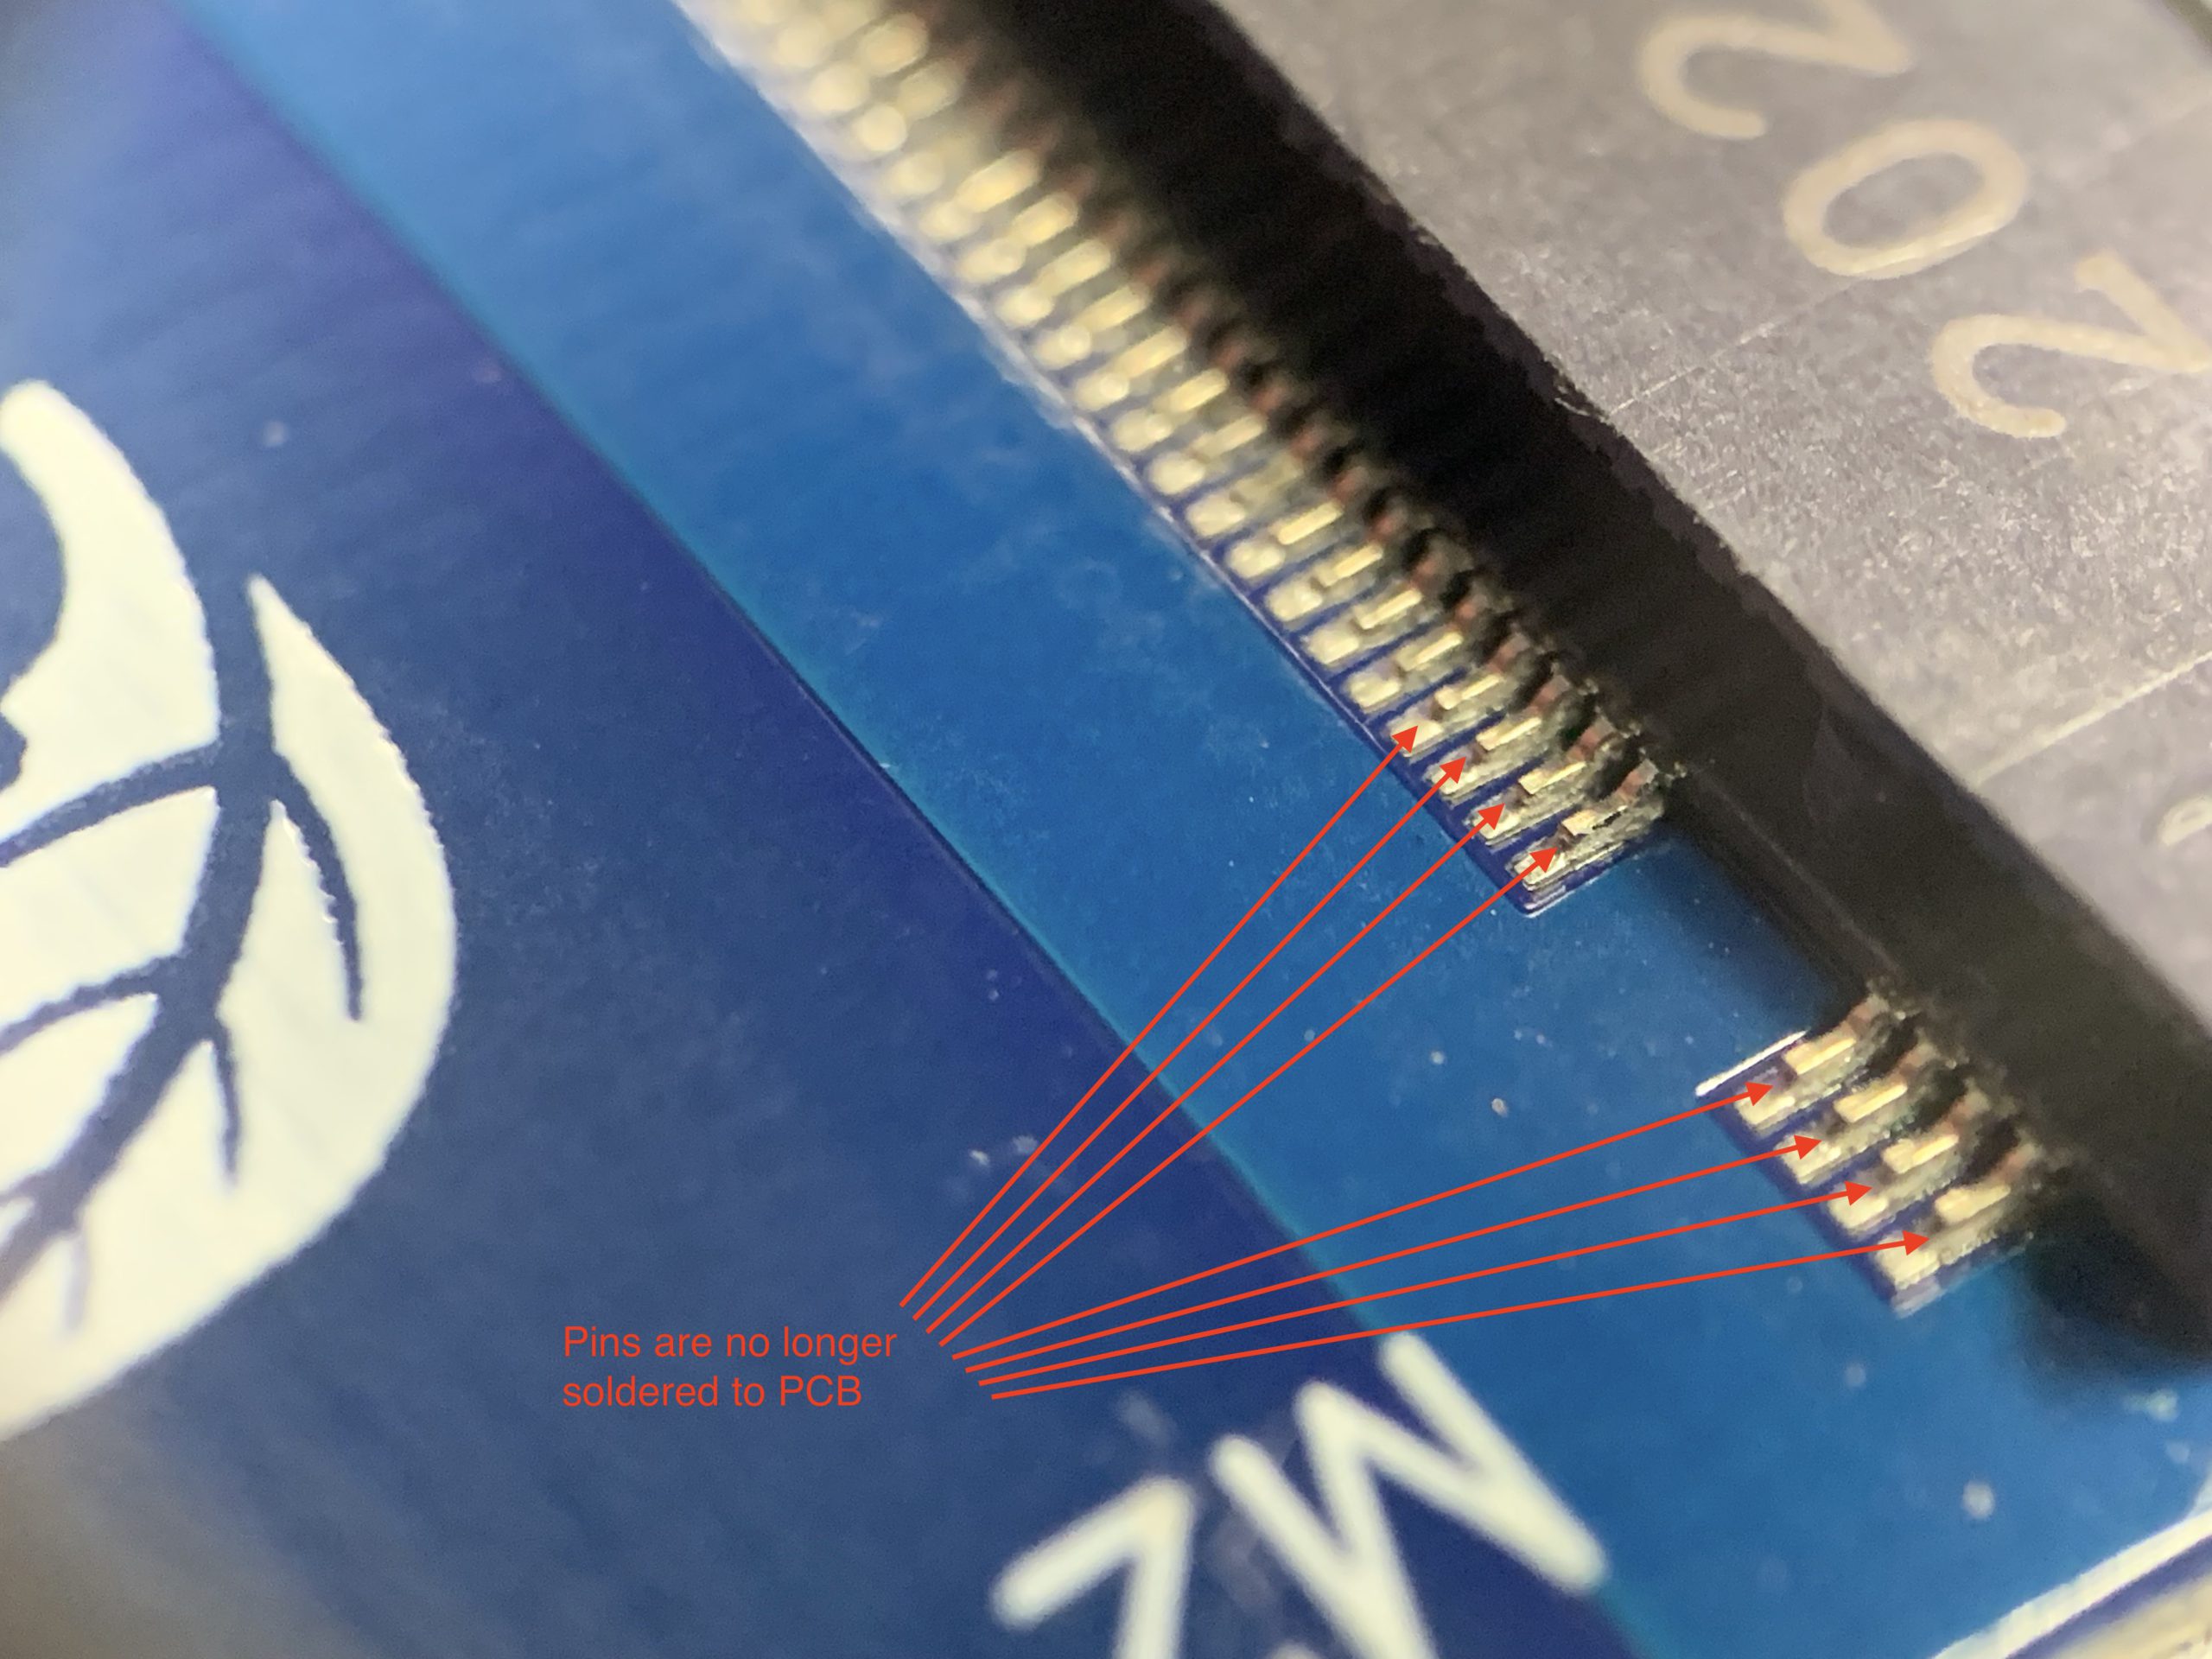
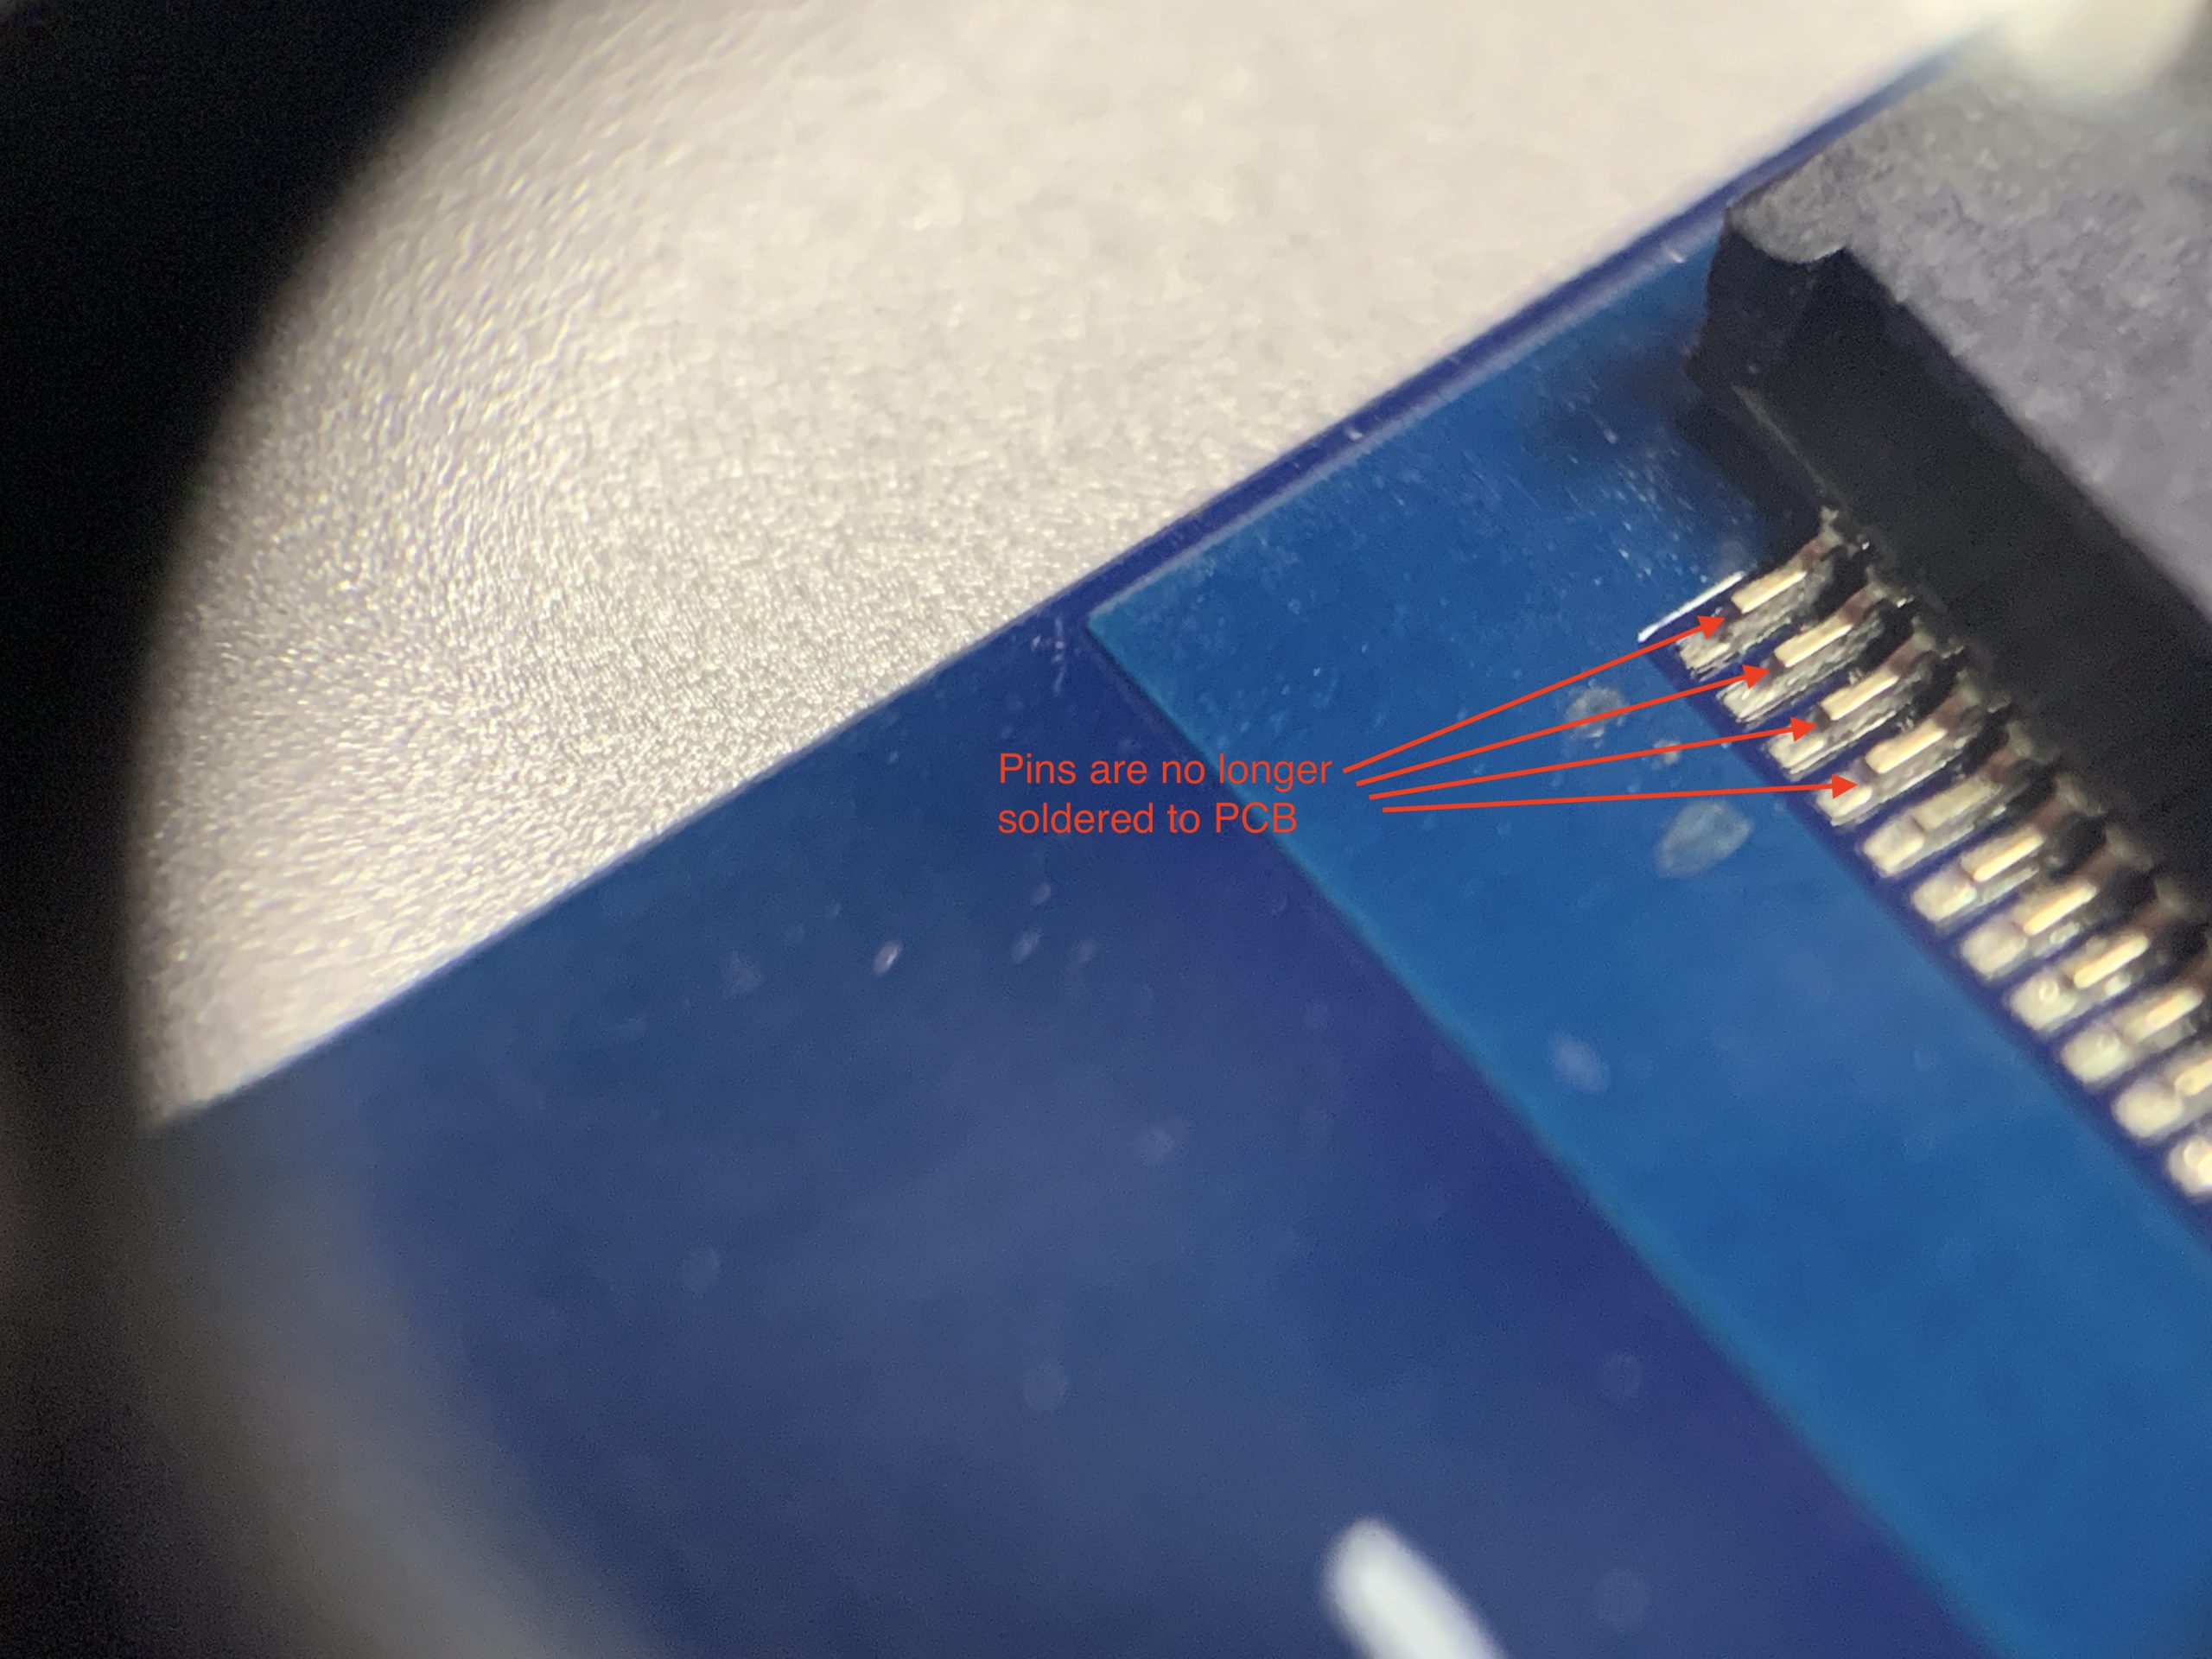
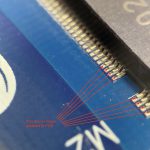
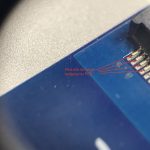
In the past I resolved these errors by ordering a new adapter and then things were fine again. I had a couple bad adapters (the original ST-NGFF2013 and QNINE) and decided to use my trusty 10x loupe to look closer at the failed PCBs. As shown in the pictures below the outer pins near the edge of the rev. C/D board pulled away from the Sintech ST-NGFF2013 rev C adapter, seemingly no longer soldered to the board:
I also looked at a failed Sintech ST-NGFF2013 (sorry, no pictures) and found the outermost pin (ground?) had cracked away on one side.
I made a warranty claim to Sintech on the rev. C/D board, but wanted to quickly revive my macbookpro11,4. Since the original ST-NGFF2013 had only one pin cracked away, I decided to pull out my trusty soldering iron and fix it. A quick dab of silver solder and the old ST-NGFF2013 was working admirably with my macbookpro11,4 again on May 30. It’s now a week later and not a single kernel panic. Better yet, Sintech agreed to send me a replacement rev. C/D ST-NGFF2013 and I expect to have that next week. Will report back afterward.
P.S. I purchased the ST-NGFF2013-D adapter on Amazon because I understood it may have a lower profile than the ST2013AM2. Maybe others can report in the comments what has worked better for them.
** Update 9-9-2022 **
I observed the first kernel panic with the repaired/resoldered QNINE board(!). I decided to pull it out and take a look at it, surely another pin has popped loose? Turns out I never soldered one of the grounds on the far side of the board – facepalm. I soldered the ground back down and instead of putting it back in service I put the board in my backup supply – surely it will work when I need it to someday, the disconnected pin was obvious and easy to see. Instead, I took the opportunity to install the repaired/resoldered ST-NGFF2013-D and it works fine!
** Update 9-22-2022 **
It’s been almost 2 weeks and the repaired/resoldered ST-NGFF2013-D continues to run fine without kernel panics – woohoo!
Thinking more about Sintech, Xiwai, or QNINE adapters, before I install any of these in anyone’s older MacBook, it makes sense to pull out a 10x loupe or better and inspect the pin connections on the adapter. If any have separated as shown above, heat the connections with a solder gun, apply silver solder, and everything should be fine. If that doesn’t help, consider using an eraser or fiberglass pen to gently rub the leads and remove corrosion.
Final thought: NVMe SSDs are a relatively long skinny board and on 2012-2015 MacBook Airs and Pros the SSD connects to the adapter at one end and is screwed to the logic board at SSD’s other end. I’m wary that over time a MacBook is flexed and can stress the SSD by pulling on the adapter end. Pulling on the adapter end is bad because the solder points and to a lesser extend the logic boards SSD pins are all that is holding the NVMe in place. Seems there’s no room to screw the adapter’s pin-end down, while a piece of kapton tape might help? The solder fix above isn’t bad if you have access to a soldering gun or a friend who does. And if you don’t mind being down for a few days, Sintech stands behind their adapters and will offer to send you a replacement. I didn’t bother to approach QNINE on a warranty swap, but maybe I should have?
** Update 9-22-2022 **
Tina said her MacBookPro12,1 was suddenly belching daily kernel panics, this after I put a short little QNINE adapter in her machine to accommodate a 1 TB drive. I opened her MacBook Pro, pulled the adapter, and inspected it with the 10x loupe. No broken connections. I decided to clean the adapter pad pins as they didn’t seem to be a shiny copper color any more. I’ve used white erasers in the past, but this time I used a fiberglass pen, which you rub on the pads using a circular motion. The pads are all shiny so I put the adapter back in her Mac and she said it is working fine today. Will update this later.
** Update 10-19-2022 **
Tina’s machine seems fine, but my macbookpro11,4 machine is having kernel panics. I switched out the long Sintech adapter and went to the short-form Sintech adapter, but 4 days later, on 10-23-2022, a panic occurred.
** Update 10-23-2022 **
I installed SsdPmEnabler to reduce power consumption while the SSD is sleeping. This driver will need to be reinstalled after every macOS upgrade, upgrade instructions are at the link above. If this doesn’t help, I may try supporting the adapter better (reportedly foam tape under it) so it can’t move while the machine is being transported. I may also try adding kapton tape to both sides of the adapter. If none of this helps, I’ll try purchasing a new adapter. After making the 10-19-2022 swap, the long adapter appears to need more solder work and it’s also possible the pins on the macbookpro11,4 need some buffing with my fiberglass pen if it will fit in there.
** Update 10-25-2022 **
Finally nailed it! The fix on 10-23-2022 did not work, but the fix is related to power. To temporarily get around the issue of your Mac being stuck in a boot-loop has nothing to do with the SSD, but potentially it’s power draw and a bad/aging battery. The temporary workaround is to disconnect your battery from the logic board and run off of the AC adapter. So far this is working flawlessly and I’m hoping the permanent fix is to purchase a new battery. I’ll place an order for a new battery and report back how it works.
** 10-26-2022 **
I never placed an order for a new battery, but noticed another video where a user disconnects the battery as I have above, boots the machine with the battery detached, shuts the machine down, and reconnects the battery. I did this and things might just be fixed. More tomorrow.
** 12-21-2022 **
While I ordered the FDMF chips, I am nervous to solder them in. My soldering and hot air experience have grown substantially in the last year-plus, but I didn’t want to wreck the macbookpro11,4. Anyway, I probably should’ve tried, I found the machine non-responsive this morning and it appears the CPU arc’d over. Damn it! I’m going to trade this logic board into iFixit for store credit and then pick up a new logic board, preferably one with a dGPU. Upgrade! I rarely give up on my Macs.
** 7-12-2024 **
I put the upgraded logic board in a machine for Liam and it has been working fine for him. I have my own macbookpro11,5 that I purchased from k-bid.com and it is starting to have the random shut-off now too. This is a warning that I soon need to replace it’s FDMF chips as others recommend.