My “snowpup” wouldn’t fire up today to hit a few inches of fresh stuff that landed and that was disappointing, as 4 days earlier when it was 70 degrees it fired up just fine.
I committed a few errors from last winter:
1. I left treated gasoline in the tank.
2. I may not have pulled the cord until there was minor tension to seal off the intake valve.
After pulling 50 times, I figured I checked the gas tank and it was mostly empty. I topped the tank with fresh fuel, 50:1. I went to start it again and no dice. I pulled the spark plug out and it was soaked in fuel. Ugh. Dried the spark plug tip and put it back in. Pulled the cord, still nothing. Figuring something else was wrong, I brought it into the trusty Schwie Shop in the basement.
After a few hours of warming up, I pulled the bottom cover off (2 screws!) and found another problem. The primer hose broke off just behind the bulb. Argh. Worse, the primer line was leaking fuel out the broken end. Surely this is contributing something to the problem. For now, I’m putting a small binder clip on the end of the hose and I’ll order one of these:
44-2750 Body – Primer
While tinkering inside the motor area, I remembered the choke was flinging back and forth last winter. Looking at the parts list it appears the choke is missing a few parts:
Next, I wanted to see if the snow blower was making a spark, so I removed the spark plug, reattached the plug wire, laid the tip of the plug so it was touching the outside of the motor, turned out the lights in the shop, and gently pulled the cord. Boom, a blue spark jumped across, yes! That means I don’t a plug or a plug wire, so I reassembled the machine and brought it out to the garage. First pull and it fired up!
Now, there were several things wrong with this snowblower and some conditions changed, including warming it up to room temperature. I’m still in the process of the repairs as I’ll need to get more parts, but here’s my weak connection of dots as to why it worked 4 days ago and suddenly didn’t today:
I pulled the snowblower out of the garage attic where it was stored on all 4 wheels, brought it outside, fired it up, turned it off, and then hung it by its handle inside the main part of the garage (mind you, last winter’s treated gas was still inside). Jump to today, I take it off the hook in the garage and try to fire it up, nothing. I think what happened was last year’s residual fuel doesn’t want to combust when its cold, but it’s willing to when it’s a few degrees warmer. To test this theory, I’ll run out to the garage tomorrow morning and give it a pull. If it fires up, I’m going to chalk it up to the fact that the old fuel is now burned out and mixed with enough new fuel that its willing to combust. If it doesn’t start up, it’s because I haven’t run it long enough to combust all the fuel in the hose. More later…
** Update 11-16-2020 **
I pulled started the snowblower a couple more times over the next couple days and it started with fewer and fewer pulls until it started with a single pull, I’m pretty sure the cause was old gas in the line.
I went looking to purchase individual parts to make the above repairs and it came to about $20 in parts, so I ended up purchasing a carburetor assembly for $12.95 shipped from Amazon. Will install that soon to fix the broken primer bulb body and loose choke handle – the new carburetor seems to be built better than the original.
My kids are both left-handed and they each have a sweet Ibanez guitar, AEG18LII-VV. My son broke a string recently and when I attempted to look up string specifications at Ibanez.com, nothing appeared and these are pretty new guitars.
After calling Ibanez, the helpful rep said that specifications for this guitar are not listed their website, because it was manufactured as a proprietary model; however, he said specs for the AEG18L and -19L are similar. He said the guitar could use a string kit that ranges from 12-53 or 12-54, with the individual gauges being:
12, 16, 24, 32, 42, and 53
He said kits may be marketed under the following makes:
I should have replaced our American Hot Water Heater VG6250T76NV’s magnesium anode years ago – COVID continues to give me a chance to catch up. Note: I’m assuming this water heater shipped with a magnesium anode, not an aluminum anode.
I measured the distance above my hot water heater and while my installation may allow clearance to fit an OEM 32-inch anode, it seems it will be very tight and may not fit. After watching an excerpt from This Old House, I learned about a collapsible or flexible anode that has been developed, so I’ll go that route so I don’t have to try and move plumbing out of the way.
If I had selected the non-flexible OEM part number, sold by a local supplier, Dey Appliance, they recommended this part calling for a 32-inch length anode with 3/4″ NPT, and 0.84-inch diameter. Ultimately, I selected an ApplianPar flexible magnesium anode, mostly because its close to meeting the specifications and is readily available – yes, its a bit narrower, but I’m fine to replace the anode more often from now on – shame on me for waiting this long.I’ll update this post after I install it tomorrow, assuming I can get the old one out, which worries me a bit. Which reminds me, I need to pick up a 1 1/16 inch socket!
** Update 10-2-2020 **
Dad loaned me his 1 1/16 socket (thanks Grandpa Don!) paired with his Campbell Hausfeld impact wrench. I used this combo in lieu of my Makita LXDT04 impact driver, which produces less than 1,000 kg/cm to the Campbell Hausfeld’s ~3,000 kg/cm, hello!
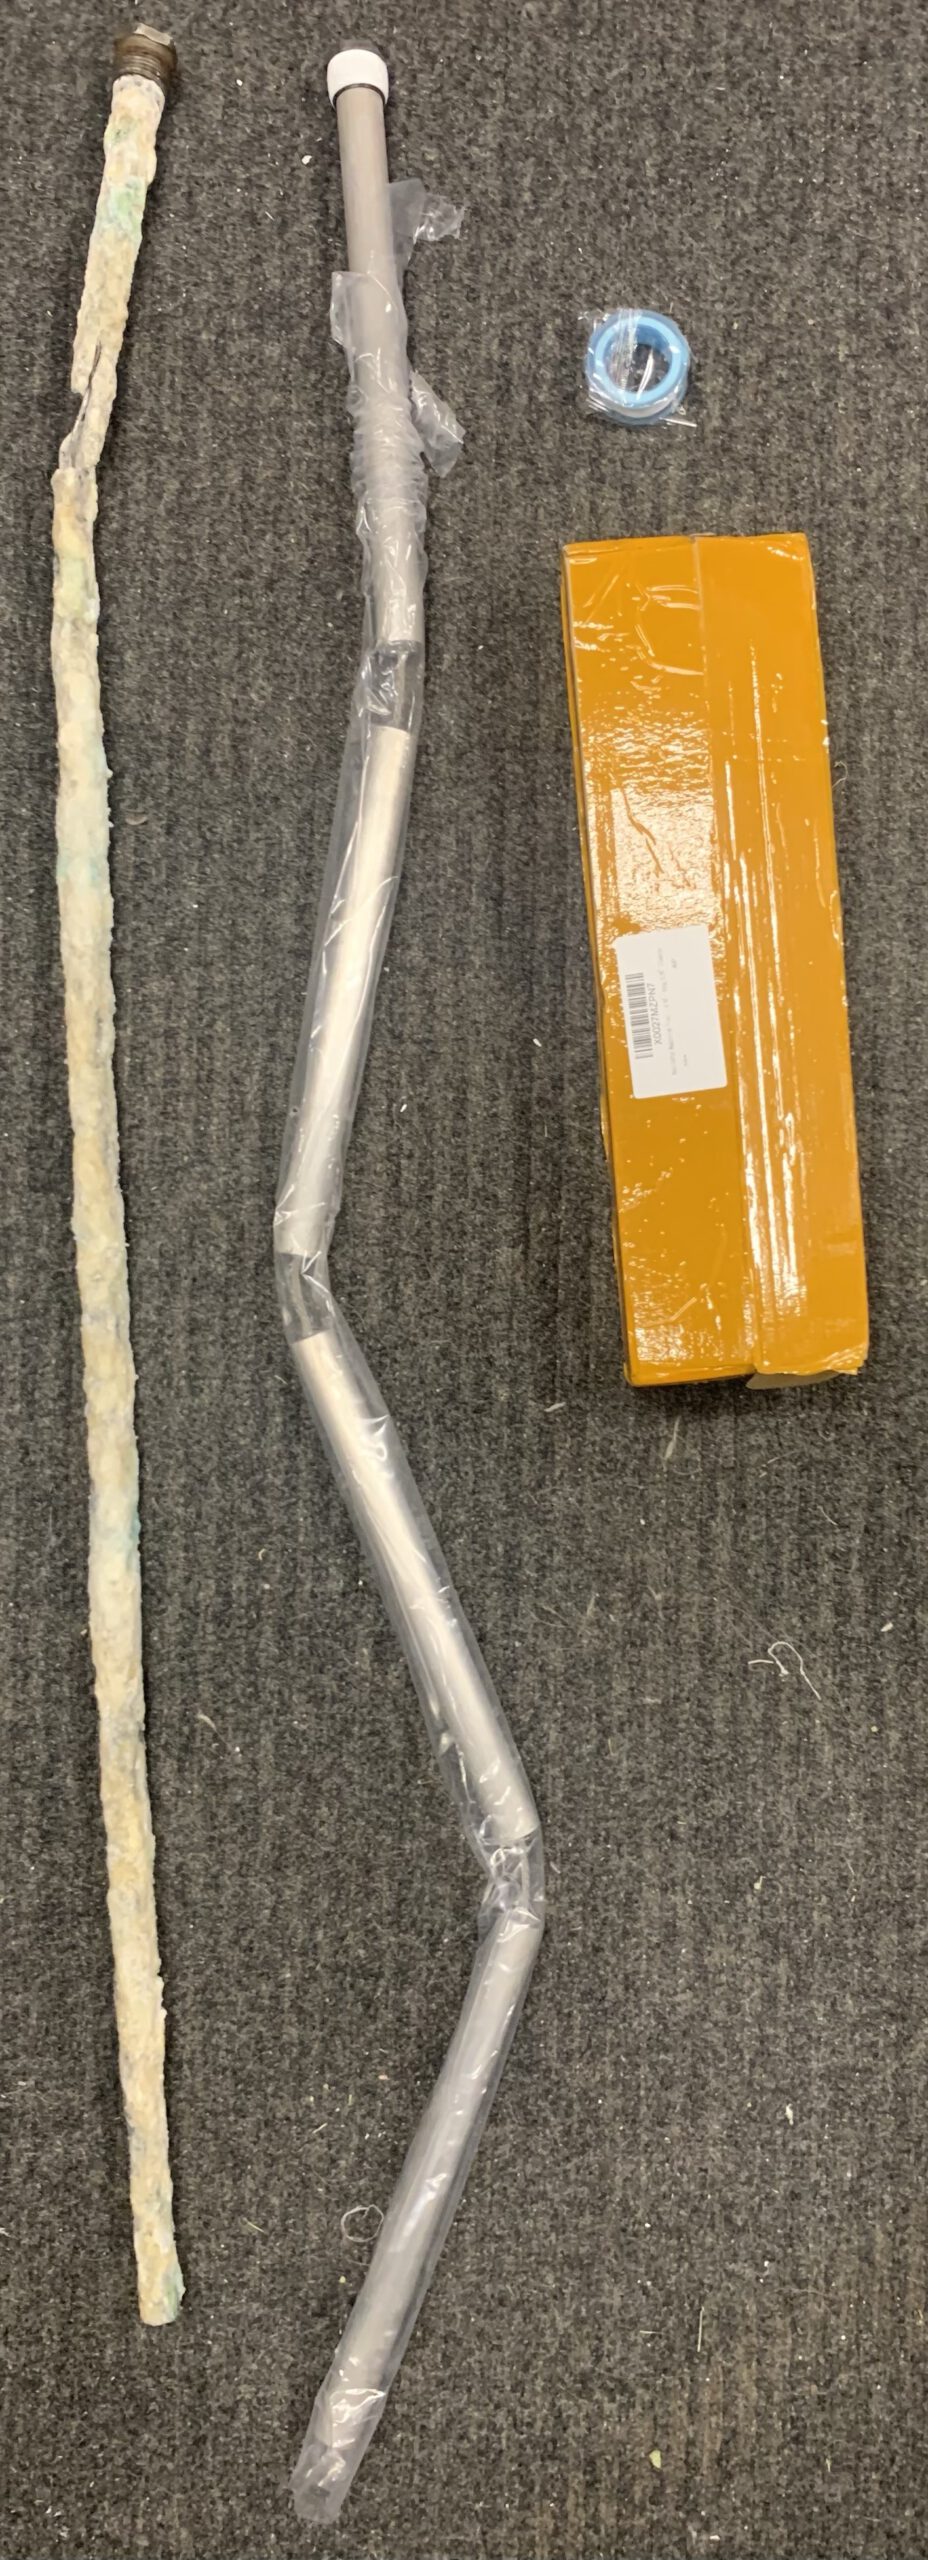
The old anode (far left in picture, below) backed out in less than a minute and with it came a load of scale from 10 years of build up, see photo below. Notice that the top of the old anode bent a little bit on its way out as very little magnesium remained, which made removing it even easier. Because of it bending on the way out and my previous measurements, I think it was the right call to go with a flexible anode for the replacement. Trying to get the flexible anode to screw in is a little challenging, but it seemed to snug up with only a turn or two. I was a little concerned about that, but after turning the water back on there are no leaks at the anode’s hex fitting.
After seeing the amount of scale on the old anode, I’m beginning to think I might need to reconsider softening my water. Saint Paul water is reportedly 5-6 grains of hardness, which MPCA classifies as “moderately hard”. The anode’s scale build up makes me question the condition of the copper pipe I installed to replace the galvanized cast iron piping shortly after we moved in 20 years ago. I’m guessing there will be more on this in a future post.
This post is about taking my son’s Knard 29×3 27 tpi tires tubeless on WTB ST i40 rims.
I’m a fan of using kapton/kapten tape for going tubeless, but my only roll at home was 50mm and the i40 rims are 40mm for which WTB recommends going 5mm wider on the tape. I wanted to set my son’s tires up this week while it was still warm out and didn’t want to wait for cheap bastard kapton eBay tape to arrive, so I procured Whisky Parts Co. tape locally thanks Now Bikes & Fitness. ** UPDATE – no longer use kapton tape, its adhesive seemed to give up in the presence of sealant. **
For those who need help with going tubeless, read a guide like this one and if that link fails, the archive may render it. I pulled off the Krampus’ front wheel and removed the tire and factory tube, an Innova 29″ x 2.5″ – 3″ with a presta valve weighing in at 14.2 ounces:
I wanted to buy some solid strip rim tape, but WTB has been out of stock, so I’m stripping width off the existing rim strip and taping over that:
Which saved another 2.6 ounces (tape roll was tared):
There will be no more than 0.6 ounces of tape per wheel:
Don’t believe me? Here’s the tape roll weighed after taping both wheels:
and 0.3 ounces/wheel for a Stans No Tubes presta valve:
We taped the rim with one pass and overlapped at the valve.
I decided to skip trying to inflate the tire with the tube and thought of this approach instead: place the tire back on the rim and manually pushed one side of the tire bead into its seated position against the inner rim wall. The loose side of the tire was left hanging downward toward the opposite inner rim while the wheel laid over a 5-gallon pail – ready for air. The air compressor was set to 120 psi to get a nice burst of air connected to the presta valve body with a used scrap of 3/16-inch diameter polyethylene tubing. After a blast of air we heard two snaps/pops – the tire is fully seated!
At this point, a large amount of air stills leaks out around the rim and tire beads – now it’s time for sealant! Pull off the polyethylene tubing from the presta valve body and fill with sealant. I used 3 ounces of leftover homemade sealant from about a month ago, still in liquid form, squeezed in with a left over Orange bottle and tubing. Blow up the tire a couple times without the presta valve insert to make sure the tire is still seated and to spray the sealant around. Reinsert the valve core and continue a few blasts with the air compressor until you think you can keep it inflated long enough to start riding it. Mine looked like this:
I found that riding the tire around is when the sealant really spreads around to help hold air, but if you can’t do it safely, just spin it or bounce it next to the air compressor.
At this point I left it for the night and had to reinflate in the next couple days, several times.
I forgot to note, my homemade sealant (3 parts windshield washer fluid and 1 part molder builder) is too latex-skimpy – others recommend 3 parts windshield washer fluid to 1.5 parts mold builder, which I will try next time.
A day later Liam left for Levi’s, riding the now-tubeless Krampus and was blown away how light they felt. I tried it myself while trying to get the sealant spread around the inside of the tires. I thought wheelies felt much easier than they use to, but I may have just been giddy to have air staying inside of them.
Last thing, we used 2.5 ounces of sealant, which may need to increase as a lot blew out one side of the rim.
Let’s run the numbers:
14.2 ounces + 2.6 ounces = 16.6 ounces lost from shedding tube and rim strip
0.6 ounces + 0.3 ounces + 2.5 ounces = 3.4 ounces gained from adding tape, presta valve, and sealant.
This means the front wheel lost 13.2 ounces. The back wheel was built the same way, so Liam’s Krampus lost over 1.5 pounds of rotational mass from this conversion.
** Update 10-7-2020 **
Both tires drop about 3 psi per hour, which requires daily inflation. Surely this can be fixed, so I pulled the front wheel off and brought it inside to run it under water. I found bubbles emerging from a few discrete points from the non-disk tire sidewall. I laid the wheel on its side, disk-side up, to make sure the sealant could get to these sidewall areas.
** 10-8-2020 **
The next morning the tire was still inflated with the leak rate dropping to 1.5 psi per hour – progress! Today, the wheel will lay sideways disk-side down to see if the opposite side of the tire needs more of a sealant bath.
I still think future batches of home-brew sealant need more latex, but its also possible I didn’t add enough latex to the tires during their initial inflation with sealant. I’ve used a dipstick since then and I can see liquid sealant remains in the tire’s annular space.
** 10-11-2020 **
I remixed the sealant and boosted the ratio to 3 parts windshield washer fluid and >2 parts mold builder. I can tell the sealant looks more viscous now. I checked each tire with the dipstick and they appeared to be dry or nearly dry, so I added 3 ounces of the revised sealant to each tire. After first doing this, sealant was still coming out of the tire sidewalls in >10 discrete points. I’ll give it a bit and see how it sets up.
** 11-3-2020 **
Still having leaks a couple minor sidewall leaks and substantial leaks at the rim bead interface. It appears that forum advice of “just ride the bike” is rubbish. After inflating the tires, shake the rim while twirling it for about 15 seconds then lay the wheel on its side for 10-15 minutes much like you’ll see in this video after the 6 minute mark:
After doing this, I can already see improvement in the leaks and its holding air much longer. Doing this shake/twirl procedure is likely why bike shops say they need 1 day to complete your tubeless request. Will report back on how this goes.
** 11-15-2021 **
Was still having problems with air leaking out and figured out kapton tape doesn’t like getting wet after I inspect Ella’s a couple weeks ago: the adhesive gives up its ghost and comes apart!
I ended up tearing the kapton tape out, used Whisky rim tape, and tossed in Fatty Strippers – now it seems to be golden, the tires are staying inflated.
** 6-15-2022 **
The tires were getting low, so I put some fresh Orange sealant in and that seems to have stopped the leaks.
** 8-15-2022 **
Tires are still holding air using Orange sealant. Fatty Strippers seem to be doing their thing. Haven’t used home-brew sealant since last year, but considering another recipe:
1 part DAP Alex Plus
1 part isopropyl alcohol
1 part water
and:
2 parts liquid latex
https://amzn.to/3hVxdcj
0.25 to 1 part ammonia* (unverified, but 0.25 parts may be best for tire and rim health)
https://amzn.to/39OhE3k
2 parts anti-freeze
https://amzn.to/39Ni1eo
4 parts distilled water
https://amzn.to/3gmNEhn
5-10 handfuls of dog fur, alternative would be a few tea spoons of corn meal
** 5-6-2023 **
A few more recipes I’m interested in trying:
https://www.mtbr.com/threads/best-tubeless-brew.406115/page-217#post-14398767
1 part liquid latex “Mold Builder” brand – Amazon
2 parts distilled water
2 parts propylene glycol -Amazon or Tractor Supply
0.3 parts ammonia – Ace Hardware “Professional/Janitorial Strength”
1 tbs (or more depending on application) cooked cornmeal – Kroger
(1 part is reportedly a Stan’s red scooper – WTF, why can’t bikers describe their recipes with standard recipe units?! According to one guy it is between 60 and 63 mL.
And this recipe is similar and also sounds promising:
https://www.mtbr.com/threads/best-tubeless-brew.406115/page-218#post-14879103
2pt Propylene Glycol – for antifreeze properties in cold weather
0.3pt 10% Ammonia (Percentage strength not mentioned everywhere and handy to know if you happen to stumble upon 15%, 20% or 25%) – Keeps the latex fluid and evaporates upon exposure to the air
1pt Latex – none of the recipes mention the thickness of the latex. The thickness differs between different brands. The one I can get is 3500 mPas. This is quite thick compared to other brands…
2pt Demi water
and the coagulating agent of your choice, be it tumbledryer lint, coffee grinds, hair of dog, glitter, rubber pellets, corn starch, semolina or other “secret ingredient”.
Finally, superdez75 has a really simple one:
https://singletrackworld.com/forum/topic/homemade-sealant-current-recipes/
6oz of liquid latex
14oz of water
12oz of Propylene Glycol
1/2oz of corn meal (I use fine but I think a mix of fine and medium would be effective)
superdez75 says: “This apparently is the stans recipe, I’ve used it for years and it works well. Latex already has ammonia so I would not add any, the Propylene Glycol is used to add a bit of thickness to the mix and to stop it freezing. Some people add fine glitter for when you get a bigger puncture but to be honest I would just have a tubeless repair kit on hand.”
Final note, the Knards needed more sealant this spring, but they keep working tubeless with the Fatty Strippers – what a great way to get more life out of these tires. Also, we are careful to not put more than 40 psi into these tires, 40 psi and below and they seem to work great.
My lovely bride’s 2010 Mazda 3 Grand Touring edition was in the shop last week getting a control arm repaired by the trusty team at Park Service. They noticed the headlight levelizer rod was broken and the only way to replace it is to order the entire headlight sensor assembly from Mazda for about $400.
I asked Park Service to focus on the control arm and to leave the broken levelizer rod on the seat of the car for me to look at. After getting it home, I found the headlight levelizer rod is composed of a few parts, including the THK S3-1 aluminum rod/link and bolts that can pivot with seals stamped THK F6BLV. I thought about using Blue Demon equivalent welding material to fix the part, shown below, but one of the pivot points also had a torn rubber seal that probably allowed salt to get in and corrode the joint – not worth fixing. Having the intact part allowed me to measure the bolt spacing with my digital calipers, about 57 mm.
** Update 4-10-2020 **
Part arrived from TH Motorsports via UPS Ground. I was rotating the tires today so I through the part on. Really easy to get on, especially when you’re rotating the tires. Headlights seem to be leveling again – woohoo!
My daughter loves her Ice Cream Truck, but she tires out on longer rides. Her brother rode it for a year and a half before growing out of it and rode it with tubes, but I knew tubeless was an option to drop rotational weight.
In 2012, the ICT came stock with Rolling Darryl rims and Nate tires. While both are officially clinchers, many have tried and succeeded going tubeless. I wanted to put my own spin on ghetto tubeless, using off-brand tape and homemade sealant.
For each successful tubeless build, I removed a tube (11.4 ounces) and added kapten tape (1.3 ounces), a presta valve (0.1 ounces), and sealant (2 ounces) for a savings of 8 ounces per tire. If I ever have to pull of the kapton tape and do it again, I’ll trim the rim tape a bit narrower (this will pull another 3 ounces of weight from the build and make a better seal with the rim.
My first attempt with the front wheel failed miserably. A tape seam near the presta valve appeared to fail allowing sealant to bubble out around the presta valve and nearby rim spoke holes.
My second attempt with the front wheel is still holding up, albeit with a slow leak that I suspect originates with the valve itself. Once again, I left the Surly PVC rim tape (60mm) on the rim and covered it with a tight layer of kapton tape down the middle and then a wrap on each side; 3 total passes of tape around the rim, each pass starting before and ending after the weld joint. I poked a hole with a round file and cleaned the valve hole out. I then blew the tire up with a tube to 30 psi and let it sit a couple hours to fully seat the tire. After that I loosened the bead on one side of the tire, gently removed the tube, inserted the tubeless presta valve, rotated the tire label to the valve, and filled with 2 ounces of sealant. I then placed the loose portion of the tire back in the rim and laid the loose side facing the ground while sitting on top of a 5 gallon pail. Gravity was my friend, pulling the loose bead toward the rim for the air compressor to inflate the tire.
Both tires inflated quickly. The front tire seems to have a slow leak between the rim and tire bead that I’ve been able to fix most of, but can’t quite find the last part. I fix it by inflating the tire and pushing on the sidewall of the tire until sealant hisses out. I may need to dunk the tire in a tub to figure out where the last couple leaks are, but it holds pressure for about 6 hours before going flat. The rear tire has been holding pressure throughout the night.
I’m pumped with the kapton tape and cheap sealant approach and inspired to toss it in my son’s Krampus with 27tpi Knards. I perused this guy’s approach and will probably combine it with mine.
** Update 10-4-2020 **
I’m nearly certain there’s a valve leak on the front wheel. It deflates once a day and when reinflating I’ve noticed that the valve is stuck and I have to press it with my finger to unstick it so the pump can inflate it. Surely the sealant is trying to patch the valve’s leak! More on this later.
** Update 11-1-2020 **
A couple weeks ago, I was riding on train tracks with Ben up until my ride ended abruptly. The front tire took a v-shaped slash that the sealant couldn’t repair mid-ride. The quarter inch slash finally sealed after about 5 reinflation efforts back at home, but it required removing the tire from the rim. After putting the tire back on the rim, I found so many leaks between the rim and tire bead that I decided it was time to purchase a set of FattyStrippers.
** Update 11-6-2020 **
FattyStrippers arrived today. Install one on Ella’s front tire that I popped a couple weeks ago. I peeled off all the sealant on the rim bead to start fresh (probably foolish, but I figure the FattyStripper will replace most of what I’m removing and I also want the tire to be able to slide on the FattyStripper when I inflate it.
I followed the FattyStripper instructions, but couldn’t get the beads to seat. I probably should have tried harder, but decided to toss a tube in fast and that seated both sides immediately. Pulled the tube out, put the valve back in, and reinflated by placing the wheel’s spokes on top of a garbage can and pressed the loose side of the tire into the rim with both my thighs and a free hand while using a bike pump to inflate, it worked! I then popped the valve core out, squirted in 3 ounces of sealant, replaced the valve core and then reinflated the tire. Sealant still oozed out of the rim bead area as described in previous posts, but it didn’t seem as bad. I’ve continued shaking the tire as shown in my previous post and allowing it to rest 10 to 15 minutes before shaking again and placing on its other side. So far its working and fewer and fewer leaks remain with each flip. This better work, because we’re riding to see Melvin Carter talk at Ayd Mill Road in the morning.
Since May, our Apple TV 4K running tvOS 13.4.6 (as of this morning) was having problems continuing to function as our HomeKit hub; others have reported issues with past versions of iOS. It seemed to work fine though earlier version of tvOS and seemed to start exhibiting HomeKit connectivity issues back in May 2020 when I upgraded from an SMC 100Base-T ethernet switch to a Cisco WS-C2960S-24TS-S gigabit switch. After upgrading switches, my family and I noticed using Home app outside of our home’s wifi was no longer working with HomeKit or it would take two attempts to get it to do something. With the Cisco managed switch, I was able to see half a million “Total Receive Errors”:
WS-C2960S-24TS-S
I stumbled upon Richard_W‘s post and tried two things to fix the situation:
1. Upgraded to beta of tvOS 14 and rebooted.
(the problem persisted, only now a red warning bubble appeared in front of Settings->HomeKit)
2. Reset the Apple TV 4K (Settings->System->Reset) and set it up from scratch.
After completing Step 2, I reconnected the Apple TV 4K to iCloud and HomeKit. After 30 minutes with the Apple TV 4K sleeping, so far it seems to have resumed its Home Hub duties without spamming the Cisco switch with error messages while it sleeps – woohoo!
For the record, since completing the reset, the Apple TV 4K’s “Total Receive Errors” are holding steady at 495,436. I’ll continue to post updates here if the problem returns.
We noticed the right side door of our KitchenAid KSCS25FJSS01 wasn’t closing as well as it use to, it seemed the door would always get stuck open whenever someone pushed it shut.
I reviewed the KitchenAid parts guide and it shows 2182179 (Door Closer, Upper Cam) for the refrigerator door and 2208137 (Hinge & Cam Assy) for the cabinet, each on the lower/bottom side of the door hinge. Our freezer door works fine, so I didn’t bother with parts for that.
Part 2208137 seems to be expensive, not in-stock, and includes the metal bracket, which isn’t worn and fully intact on our fridge, so I figured there must be a cheaper way.
Instead, I decided to roll the dice on part number 4318165, which doesn’t appear in the KitchenAid parts list. This part is a set of plastic cams where most of the hinge-wear occurs. Watching this video shows the cams are easy enough to replace.
After the door cam kit arrived, I took the door off of our fridge and found the existing door cams are riveted to the steel bracket! My trusty Dremel and cut-off blade ripped through the rivet and existing door cam and I used an 8mm screw and nut to replace the rivet.
After getting the door back on, the fridge door is fixed. Better yet, the door cam kit comes with two sets of cams and since our freezer door cams don’t require replacement at this time, I’ve got an extra set of cams I can use on our heavy door after it wears out again. Note, next time the replacement will be much easier now that the rivet is history.
** Update 9-20-2020 **
The door was starting to slip again and I thought the cam bolt had loosened and it might need some thread-lock, but I was wrong. When I pulled the door off and inspected everything, the cam bolts were still snug, but I realized from last month I had been unable to get the hexagonal cam shaft out of the refrigerator, because the hexagonal shaft broke off inside. Because the old hexagonal shaft remained, I was unable to insert a new cam with the the hexagonal shaft in the lower right corner of the refrigerator door and instead used another bottom cam flipped upside down to replace the lower corner upper cam. Since the new upper cam wasn’t connected to the hexagonal shaft, it would pivot and shift when opening the refrigerator door.
Quick fix. Pulled the door back off and used a No. 5 screw extractor (9/16 – 3/4 inches, M14-M18) to removed the old hexagonal cam shaft. After the screw extractor was fully seated, I was able to rock the drill (off) in a circular motion while pulling away from the refrigerator door and out the old hexagonal shaft popped.
With the old hexagonal cam shaft fully removed, a new upper cam with hexagonal shaft could inserted – woohoo! After putting the door back on and tightening up the bolts, the door is working better than ever. I also noticed that the upper cam’s hexagonal shaft seems to help boost the door up a millimeter or two, so its now perfectly flush with the freezer door to the left – hell, yes! For anyone reading this or operating a refrigerator as old as ours, I strongly recommend you do the repair – very satisfying and a cheap fi
I still haven’t bothered with the freezer door’s cams. The kit comes with cams for both doors, so I’ll save the extra cams for when we wear out the main door cams again, the cams are the same, but its obvious the main door carries much more weight.
Liam’s black iPhone 7 has suffered a broken screen a couple times this year, so we’ve had the pleasure of trying a few different replacement screens that we installed ourselves. For his first replacement, we tried this one sold by Miardo:
The initial shipment of this screen was so bad we sent it back to Amazon and requested a replacement – the screen was ridiculously, as Liam says, “laggy” in response to any touches. The replacement to the replacement improved on the lag in touches and being an improvement over the first shipment, Liam decided to keep it. It lasted 6 months before he got flipped by a buddy and the phone shot from his pocket on to sidewalk, requiring us to look for another screen replacement.
For the next screen replacement, we decided to shake things up and try a different listing on Amazon. This time we tried bought from the seller Koofix and picked up this model:
Good news is, the tap responsive is wonderful and Liam loves it! He says the touch responsiveness is back to feeling like an OEM screen, so I’d consider this a win.
And hopefully this one also lasts longer than the last one.
I’m stubbornly keeping macOS Server on my Mac mini running High Sierra, as I love it’s GUI for controlling server components. I understand macOS Server wasn’t a profit leader for Apple, but it was such an elegant solution for some of us! Darn it, my mini will probably get hacked for its server components being out of date before someone pries my fingers off macOS Server.
Anyway, today I noticed I was suddenly having conflicts trying to launch Homebridge on port 8080 after installing a security patch on High Sierra. It appears the security patch messes with macOS Server’s web server settings. Fortunately, mighty Wayne Dixon encountered this issue on Mojave and published a fix. Thanks, Wayne! I changed mine from 8080 to 8081.
For now I’m back in business and reading Wayne’s solution might have tempted me to try Mojave if this mini was compatible and it won’t be unless I also try DOSDude1’s app to load Mojave… Hmmm, I’ll think about it…
Also, I briefly thought someone had hacked my server for their own use of port 8080, but this advice quickly helped me track down what it was with these commands:
sudo lsof -i :80 # checks port 8080
Then I saw something similar to:
COMMAND PID USER FD TYPE DEVICE SIZE/OFF NODE NAME
acwebseca 312 root 36u IPv4 0x34ae935da20560c1 0t0 TCP 192.168.1.3:50585->104.25.53.12:http (ESTABLISHED)
Which showed a service using the PID and we probe that further:
ps -ef 312
To see:
UID PID PPID C STIME TTY TIME CMD
0 312 58 0 9:32PM ?? 0:02.70 /opt/cisco/anyconnect/bin/acwebsecagent -console
Mine showed an Apache2 folder that I led me to Wayne’s fix above.