Its always something… Our Bosch SHU8805 is usually meticulous at cleaning dishes, but suddenly we noticed that the upper rack wasn’t getting as clean as the lower rack. I love solving a crime that involves broken things. Upon opening the dishwasher, I removed the top rack and noticed the back wall of the dishwasher had a sort of halo about a foot across around the location where water is suppose to enter tubing for the top and lower spray arms, as shown below:
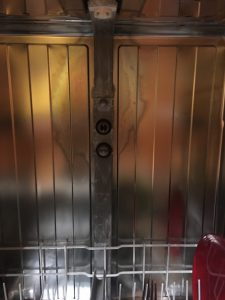
I figured the gasket must be worn, as the spray arm is constantly removed and inserted into the fittings on the back wall. Being the exceptionally cheap bastard that I am, I could have replaced the upper spray arm (00359976) and tube (00350321) with these parts, as described by the nice woman at e-Spares:
http://www.bosch-home.com/us/store/product/SprayArmAssembly/00359976
http://www.bosch-home.com/us/store/product/Tube/00350321
But, no, I’m too cheap to spend $80. Instead, I entered my hellhole, unkempt shop area in the basement and proudly emerged with some bits that were suddenly useful, including two standard garden hose gaskets and two rain barrel gaskets that were just barely bigger than the hose gaskets (you might be able to pull this hack off with 2-4 total garden hose gaskets). To do the repair, I popped the rain barrel gaskets on to the Tube fittings first, as shown in the picture above, and then slipped the garden hose gaskets on. After popping these gaskets on to the tube fittings of the dishwasher, the top rack is now getting clean again – woohoo – cheap bastard wins! And I spent more time writing this useless entry for some schlep as cheap as me.
Ok, and I probably wrote this so that when the hose gaskets fail miserably due to the hot water and strong detergents, I’ll know which parts to quickly order.
Thanks to Bosch for making all their parts readily available and to e-Spares for the slick video.