
While attempting to configure some 1028 continuous radon monitors from Sun Nuclear, I assumed correctly the manufacturer would only offer Windows software. They said it ran on XP/2000 and pretty much everything before that, so I figure it would be a good candidate to try with Wine and WineBottler on my Mac.
Use WineBottler 1.8.3 and configure it with the settings shown in the screenshot below.
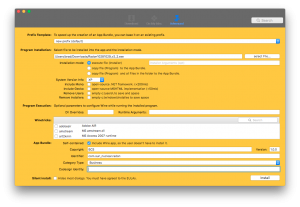
WineBottler 1.8.3 settings for Sun Nuclear 1028 software
The resulting application, saved to my desktop, boots up. Success! Almost.
Next we need to tell macOS sierra which USB to serial device and port to use. I started this, but didn’t quite get it to work yet. I think these links are going to be helpful when I dig into this further:
https://www.codeweavers.com/support/wiki/mac/faq/usbtoserial
http://hintshop.ludvig.co.nz/show/persistent-names-usb-serial-devices/
http://www.ftdichip.com/Drivers/VCP.htm
http://www.ftdichip.com/Support/Documents/InstallGuides/Mac_OS_X_Installation_Guide.pdf
https://fearthecow.net/guest/wine-serial-ports/
In the mean time, I can confirm that Sun Nuclear’s software works fine with VirtualBox, Version 5.1.30 r118389 (Qt5.6.3), running Windows XP on my Mac.
Finally, here’s what I quickly tried, but it didn’t seem to work:
1. Using the codeweavers link up above, open Terminal.app and enter:
Last login: Fri Feb 16 23:17:05 on console
BCS-MBP:~ brad$ cd /dev
BCS-MBP:dev brad$ ls > ~/disconnect.txt
BCS-MBP:dev brad$ ls > ~/reconnect.txt
BCS-MBP:dev brad$ diff ~/disconnect.txt ~/reconnect.txt
269a270
> cu.usbserial-410
450a452
> tty.usbserial-410
BCS-MBP:dev brad$ ls > ~/disconnect.txt
BCS-MBP:dev brad$ ls > ~/reconnect.txt
BCS-MBP:dev brad$ diff ~/disconnect.txt ~/reconnect.txt
269a270
> cu.usbserial-410
450a452
> tty.usbserial-410
BCS-MBP:dev brad$ ls > ~/disconnect.txt
BCS-MBP:dev brad$ ls > ~/reconnect.txt
BCS-MBP:dev brad$ diff ~/disconnect.txt ~/reconnect.txt
269a270
> cu.usbserial-410
450a452
> tty.usbserial-410
2. Incorporating info in the CodeWeavers link with the app we created with WineBottler, let’s link the tty USB port with COM1 using the following command in Terminal.app:
BCS-MBP:~ brad$ cd /Users/brad/Desktop/Sun\ Nuclear.app/Contents/Resources/wineprefix/dosdevices
BCS-MBP:dosdevices brad$ ln -s /dev/tty.usbserial-410 com1
3. Opening “Sun Nuclear.app” didn’t allow me to connect to the 1028. For this to work, I think I need to load the FTP USB drivers, which is more than I want to get into at the moment.
If anyone sees where I went wrong, feel free to chime in below.